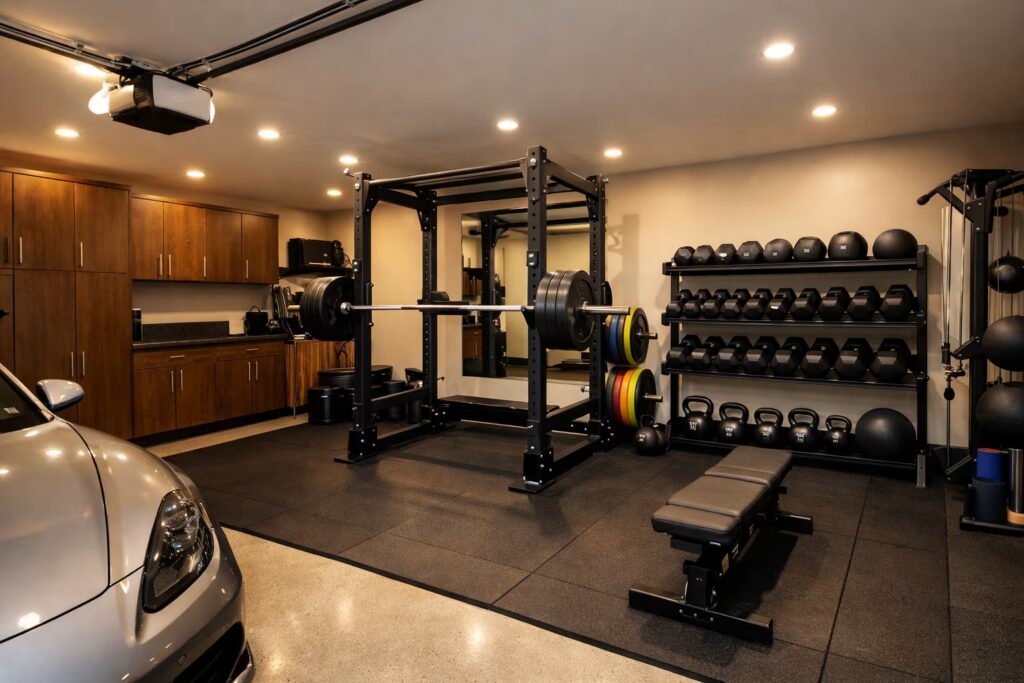
Transforming a cluttered, half-forgotten catch-all space into a dedicated fitness haven ranks among the most rewarding home improvement projects you can tackle. Stepping into a garage gym free from commercial crowds, monthly fees, and equipment wait times changes your entire relationship with fitness. Yet, without a deliberate plan for layout and storage, that grand vision can quickly devolve into an unnavigable maze of loose weight plates, rolling barbells, and tangled resistance bands. Establishing a streamlined training environment requires looking past the raw equipment and focusing intently on spatial management, vertical organization, and everyday workflow.
Assessing and Measuring Your Garage Footprint
Organization always begins with precise measurements rather than wishful thinking. Before purchasing a single rack or dragging a dumbbell across the concrete, grab a steel tape measure and chart the exact dimensions of your space. Standard single-car garages typically provide around two hundred square feet of surface area, while two-car models double that capacity, offering enough room to split between a vehicle and a functional workout station.
Pay close attention to vertical dimensions and overhead obstructions. Standard ceilings sit at eight feet, but garage door tracks, automated openers, low-hanging light fixtures, and steel support beams can drastically reduce your usable clearance. Mark every electrical outlet on your sketch; power sources dictate where you can position climate control units, wall fans, entertainment screens, and motorized cardio trainers. Note window positions and natural airflow paths to guarantee adequate ventilation during grueling high-intensity training sessions.
Establishing Core Training Zones
A professional-grade training facility relies on spatial division. When every square inch serves a distinct purpose, your workflow remains smooth and uninterrupted. Grouping your equipment into dedicated zones prevents gear from spilling into walkways and eliminates safety hazards.
The Strength Zone
Your heavy lifting apparatus serves as the anchor of the entire room. Position your power rack with its rear uprights a mere two to three inches from the wall, leaving the front wide open for dynamic movements. Crucially, verify that you retain at least four feet of clearance on both sides of the rack. A fully loaded Olympic barbell spans over seven feet; failing to account for plate-loading space on the flanks is the single most common design mistake lifters make.
The Conditioning and Mobility Zones
Cardio equipment such as air bikes and rowing machines require significantly less surrounding perimeter space than barbell lifts, making corners their ideal home. Meanwhile, carve out a dedicated six-by-six-foot perimeter for mobility work. Having a clear, unobstructed zone for foam rolling, stretching, and kettlebell swings ensures you never skip your warm-up due to a lack of open floor.
Mastering Vertical Storage Solutions
Floor space is sacred territory in any garage fitness setup. Letting dumbbells, plates, and accessories rest directly on the ground transforms your training area into an obstacle course. Exploiting vertical wall space is the ultimate secret to a clean, highly efficient training environment.
Pegboards and Wall Mounts
A heavy-duty sheet of pegboard mounted securely into structural wall studs provides an infinitely customizable holding system for lighter gear. Hang resistance bands sorted by tension, lifting straps, wrist wraps, and jump ropes in precise, labeled locations. Similarly, never let barbells lean haphazardly against walls where they can slip, roll, and damage their knurling. Horizontal gun-rack style mounts or vertical sleeve cradles keep your bars secure, elevated, and out of harm’s way.
Plate Trees Versus Rack Horns
Weight plates represent the heaviest load in your gym. Freestanding plate trees equipped with locking casters offer mobility and keep large inventories of bumper plates organized by weight within arm’s reach of your rack. Alternatively, bolt-on weight horns attached directly to your rack uprights eliminate the need for a separate footprint entirely, centralizing your loading process.
Managing Climate and Environmental Factors
Garages are notoriously harsh environments, subject to freezing winter temperatures and suffocating summer humidity. Unprotected steel equipment reacts poorly to moisture fluctuations, making environmental control a necessity rather than a luxury.
- Insulation: Installing rigid foam board insulation inside your garage door panels and exterior walls stabilizes internal temperatures and dampens workout noise for your neighbors.
- Humidity Control: Operating a compact dehumidifier during damp seasonal transitions prevents flash rust from oxidizing your barbells, plates, and rack hardware.
- Airflow and Heat: A heavy-duty wall-mounted oscillating fan keeps air circulating during intense conditioning blocks, while a portable electric space heater takes the bite out of sub-freezing morning workouts.
Selecting the Right Flooring Foundation
Never rely on bare concrete for a home workout space. Concrete is unforgiving on joints, prone to cracking under dropped loads, and amplifies the deafening sound of iron hitting stone. High-density rubber gym flooring provides the ideal shock-absorbing surface.
Interlocking rubber tiles or heavy-duty agricultural horse stall mats at least three-eighths to one-half inch thick protect your subfloor and deaden impact noise. For heavy Olympic weightlifting, consider building a dedicated wooden lifting platform flanked by rubber drop zones to preserve your equipment and structural integrity.
Maintaining the Car and Gym Hybrid Layout
Many homeowners must balance their passion for fitness with the practical need to park a vehicle inside the garage each evening. Achieving this dual-purpose layout requires strict adherence to spatial boundaries and mobile equipment selection.
Keep all fitness infrastructure strictly restricted to one half or the perimeter of the garage. Maintain a wide, unobstructed pathway from the main interior house door to the exterior garage door, and enforce a dedicated buffer zone between your equipment racks and your vehicle parking stall. A stray rolling dumbbell or a tipping barbell can easily cause hundreds of dollars in auto body damage if left unsecured.
Establishing Daily Reset Habits
The finest storage infrastructure and layout planning will fail if you abandon basic housekeeping discipline. A disorganized gym breeds friction, leading to skipped workouts and diminished motivation. Concluding every training session with a five-minute reset establishes a sustainable routine:
- Re-rack all bumper and iron plates onto their designated trees or horns, sorted neatly by size.
- Return barbells to their wall holders or rack J-hooks.
- Place dumbbells and kettlebells back onto their dedicated A-frame stands.
- Wipe down bench pads, high-touch surfaces, and equipment handles with disinfectant.
- Sweep away accumulated chalk dust and rubber debris with a quick pass of a broom.
Treating your garage gym with the professional respect of a commercial facility ensures it remains safe, visually appealing, and ready for action whenever inspiration strikes. By investing in vertical storage, defining clear activity zones, and committing to daily organization, you create a training space that empowers your fitness journey for decades.