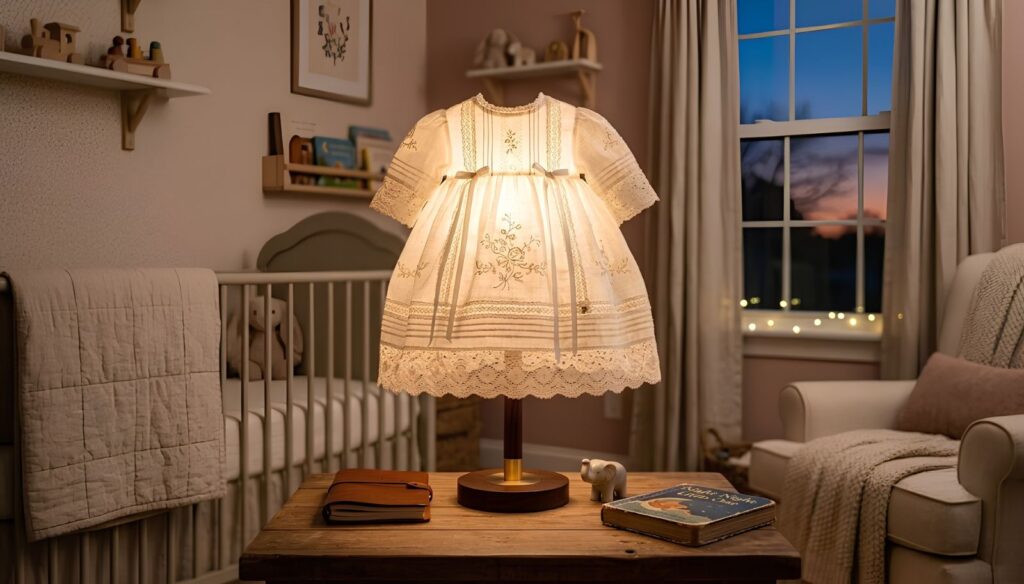
When children grow up, parents often pack away their clothes and store them in boxes. It’s an emotional moment, and most parents would rather not hide those memories away. A wonderful alternative for personal home decoration ideas is turning your baby’s heirloom dress into a nursery lamp; because precious keepsakes like a first birthday outfit or a coming-home dress shouldn’t be left to stain in a storage box.
By transforming this sentimental dress into a nursery lampshade, you can relive those cherished memories every single day. The best part? You don’t have to ruin or destroy the dress at all.
Thanks to hidden hand-basting, this project is 100% reversible. Without using any glue or making a single cut, you can easily restore the dress to its original condition whenever you want just by snipping a few threads.
Here is a practical, step-by-step craft guide to help you create a safe and beautiful baby dress lampshade from scratch.
🛡️ Safety Note: Always use low-wattage LED bulbs (max 6W) for fabric lampshades. Never use traditional incandescent or halogen bulbs, as they generate excessive heat and pose a fire hazard.
1. Choosing the Right Hardware: Matching Garment Sizes to Lamp Frames
Before buying a frame, you need to understand how garment construction interacts with lamp hardware. If your wire frame is too large, the dress zipper won’t close. If it’s too small, the fabric will sag awkwardly and sit too close to the light bulb.
Garment & Wire Frame Sizing Matrix
- 0 to 3 Months: Use a Mini Empire or Candlestick Frame (5″–6″ Height | 6″–7″ Bottom Ring). Fits tight collar line dresses best.
- 6 to 12 Months (The Sweet Spot): Use a Classic Empire or Bell Frame (7″–9″ Height | 8″–10″ Bottom Ring). Works brilliantly with A-line froids and birthday rompers.
- 18 to 24 Months: Use a Drum or Wide Empire Frame (10″–12″ Height | 10″–12″ Bottom Ring). Provides the extra waist clearance needed for thicker fabrics or lined party dresses.
Understanding Fitter Types (How the Shade Attaches)
- Spider Fitter: This is the most stable option. It features a center washer that sits on top of a metal harp attached to the lamp base, secured with a finial. Best for dresses 6 months and larger.
- UNO Fitter: The fitter ring threads directly onto the lamp socket itself. Excellent for small accent lamps on nursery dressers where you want a low-profile look.
- Clip-On Fitter: Clamps directly over the bulb glass. Only use this if you are using ultra-cool LED bulbs, as direct metal-to-glass contact can build up localized heat.
2. Thermal Physics & Safety: Keeping Delicate Fabrics Cool
Pairing heirloom textiles with electrical fixtures demands strict heat management. Much like designing a safe, family-friendly kitchen where hot cooking zones are kept out of children’s reach, keeping your baby’s dress 100% safe requires following non-negotiable lighting rules. Traditional light bulbs generate heat levels that can scorch vintage cotton, melt nylon tulle, or create serious fire risks.
To keep your baby’s dress 100% safe, follow these non-negotiable lighting rules:
The LED-Only Rule
Never use incandescent or halogen bulbs. Period. Incandescent bulbs waste up to 90% of their energy as raw heat. Use LED bulbs exclusively, which run cool to the touch even after being left on for hours.
Wattage & Lumens
Stick to a 4.5W to 6W LED bulb (which gives off the light equivalent of a standard 40W bulb). This produces a soft, ambient glow perfect for late-night feedings without stressing delicate lace or thin cotton.
Color Temperature (2700K Warm White)
Always check the bulb box for 2700K (Warm White). Avoid 4000K–5000K daylight bulbs. Cool daylight spectrums emit strong blue-light waves that alter the pastel hues of baby clothing and can disrupt your baby’s natural sleep rhythms.
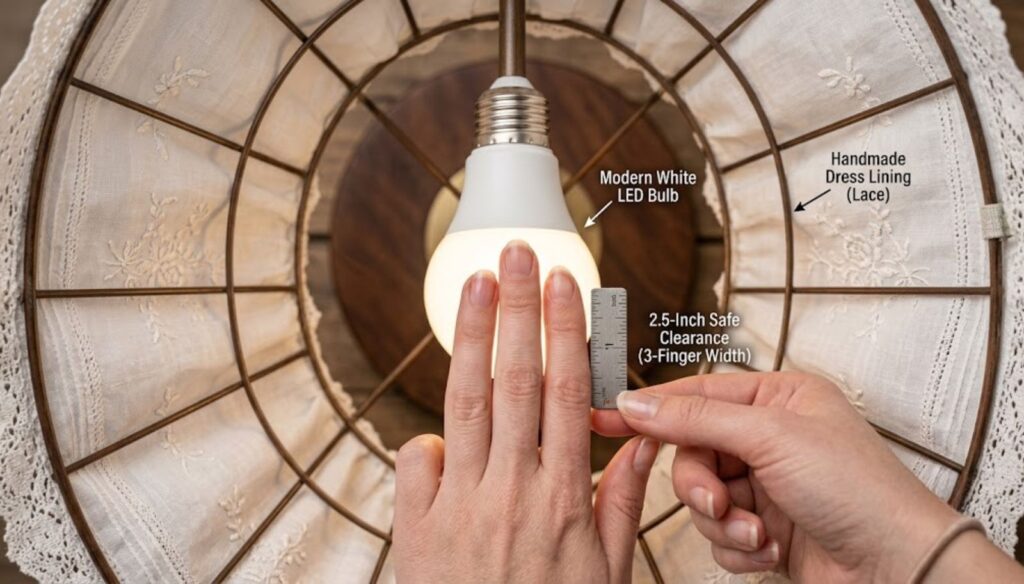
The “Three-Finger” Clearance Rule
Always ensure there is a minimum clearance of 2.5 inches (roughly three finger-widths) of open space between the outer surface of the LED bulb and the inside lining of the dress. Air circulation inside the frame keeps temperatures ambient.
3. Tool & Materials Checklist
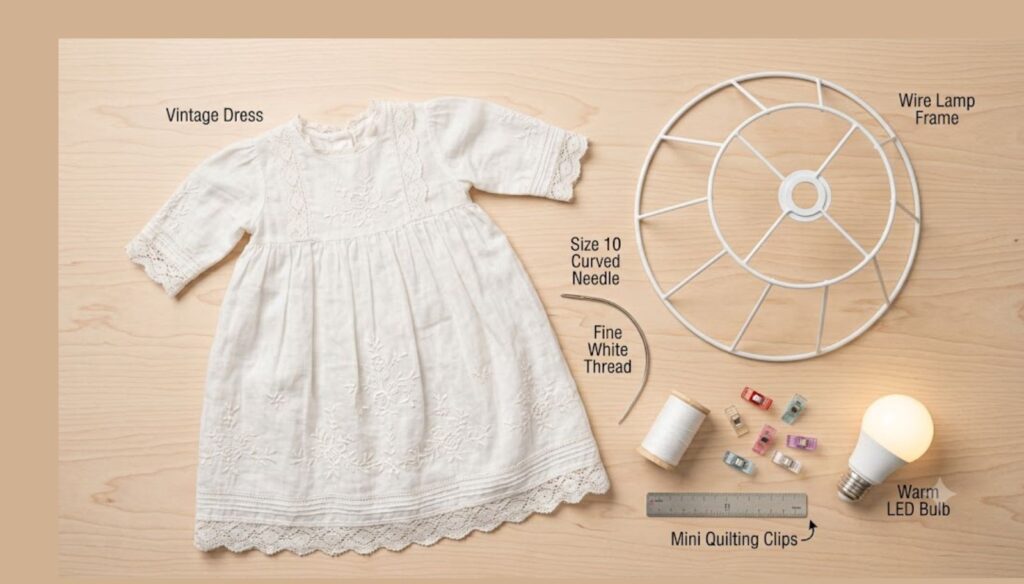
Gathering the right supplies makes the assembly effortless:
- Pre-washed baby dress (Steamed flat; do not use spray starch).
- Epoxy-coated white wire lamp frame (White coating prevents bare metal from transferring rust spots onto the fabric over time).
- Table lamp base with a sturdy, weighted bottom. If you prefer a natural aesthetic, pair your fabric shade with a smooth bamboo coat rack style wooden base or solid oak base.
- 4.5W LED bulb (2700K Warm White, non-dimmable or dimmable).
- Extra-fine silk or cotton basting thread (Match the thread color precisely to the dress’s primary fabric).
- Size 10 curved upholstery/mattress needle (Curved needles allow you to loop thread around metal wire inside tight spaces without bending needle shafts).
- Mini craft clips or quilting clips (Safer than straight pins, which can snag delicate embroidery or lace).
- Handheld garment steamer.
- Non-toxic fabric flame-retardant spray (Optional, but recommended for unlined antique lace).
4. Step-by-Step Assembly: The Zero-Damage Basting Method
Step 1: Pre-Treat & Steam the Garment
Use a garment steamer to clear all wrinkles from the dress before mounting.
Pro-Crafter Tip: Never use spray starch. While starch makes ironing easier, residual starch cooks slowly under bulb heat, turning yellow over time and permanently staining white or ivory fabrics.
If using fabric flame retardant spray, mist the garment evenly from 12 inches away in a well-ventilated area, then allow it to dry completely for 24 hours before assembly.
Step 2: Position and Balance the Fit
- Fully unbutton or unzip the back of the dress.
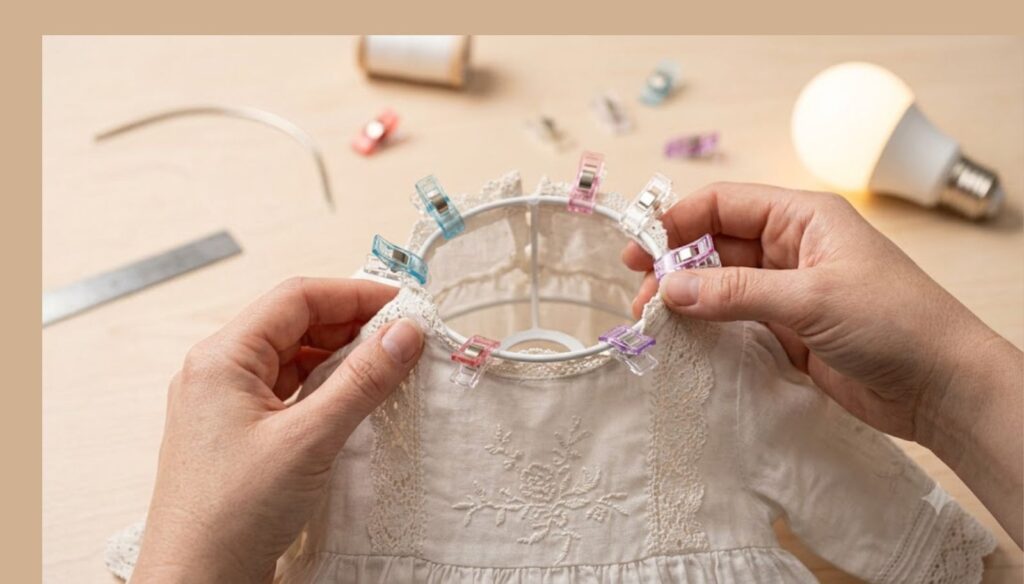
- Carefully lower the wire lamp frame through the neck opening of the garment.
- Align the neck collar seam precisely with the top wire ring of the frame.
- Use your mini craft clips to clamp the dress to the top wire at four cardinal points: Front, Back, Left, and Right. This distributes the weight of the skirt evenly around the wire so the hem doesn’t tilt.
Step 3: Apply Hidden Interior Basting Stitches
- Thread your curved upholstery needle with a single strand of fine basting thread and tie a small knot at the end.
- Working strictly from the inside of the frame, catch 2 to 3 threads from the dress’s interior neck seam allowance (the extra fabric inside the seam).
- Loop the needle over the top wire frame and pull gently until snug.
- Cast loose stitches approximately 1/2-inch apart along the entire circumference of the top ring. Because you are stitching into the inner seam allowance, no thread lines will be visible on the outside of the dress.
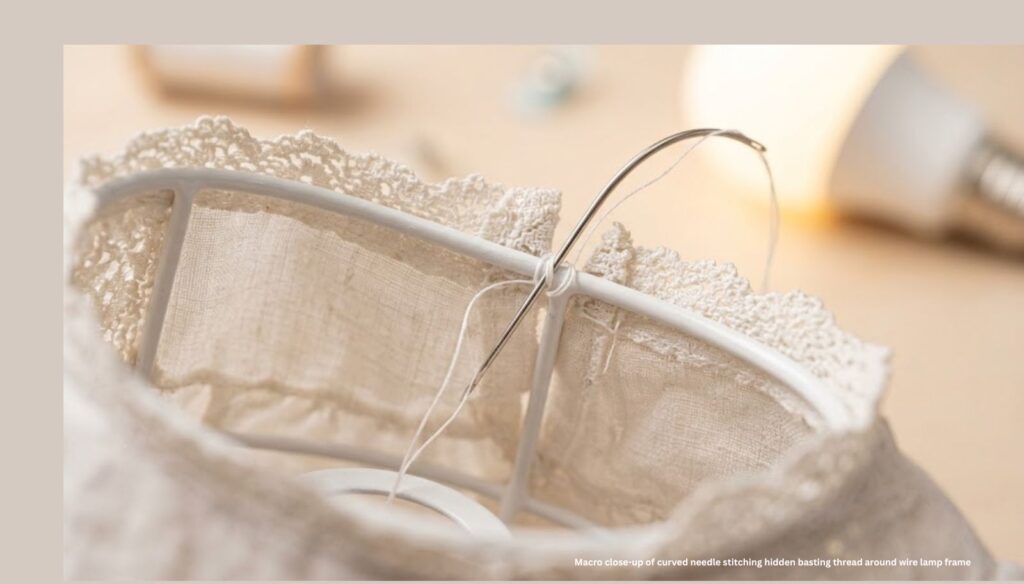
Step 4: Secure the Sleeves, Closure, and Hem
- Sleeves: Pull armhole seams flush against the vertical struts of the wire frame. Place two tiny tack-stitches under each armpit seam to keep sleeves from drooping outward.
- Back Closure: Fasten the buttons or zipper around the back vertical wire struts. If the fit is slightly loose, overlap the back edges slightly before buttoning.
- Hemline: If the dress skirt extends past the bottom wire ring, gently tuck the excess lining fabric up and inside, securing it to the bottom ring with wide, loose whipstitches.
5. Solving Common Framing Problems
- Problem: The wire frame shows through sheer lace or thin organza.
- Solution: Before mounting the dress, slide a plain white cotton slip or a layer of plain white organza over the bare frame. This acts as a built-in diffuser, hiding wire shadows and softening the bulb light.
- Problem: The dress skirt sags unevenly to one side.
- Solution: Your thread tension was too tight on one side during basting. Snip those specific basting threads, re-clip the dress at four equal points using your craft clips to re-balance the hem, and re-stitch loosely.
- Problem: The zipper/buttons won’t reach across the back wire.
- Solution: The bottom ring of your frame is too wide for the dress’s natural waistline. Switch to a narrower Empire or Candlestick frame shape to relieve tension on the back closure.
6. Safe Placement & Long-Term Care
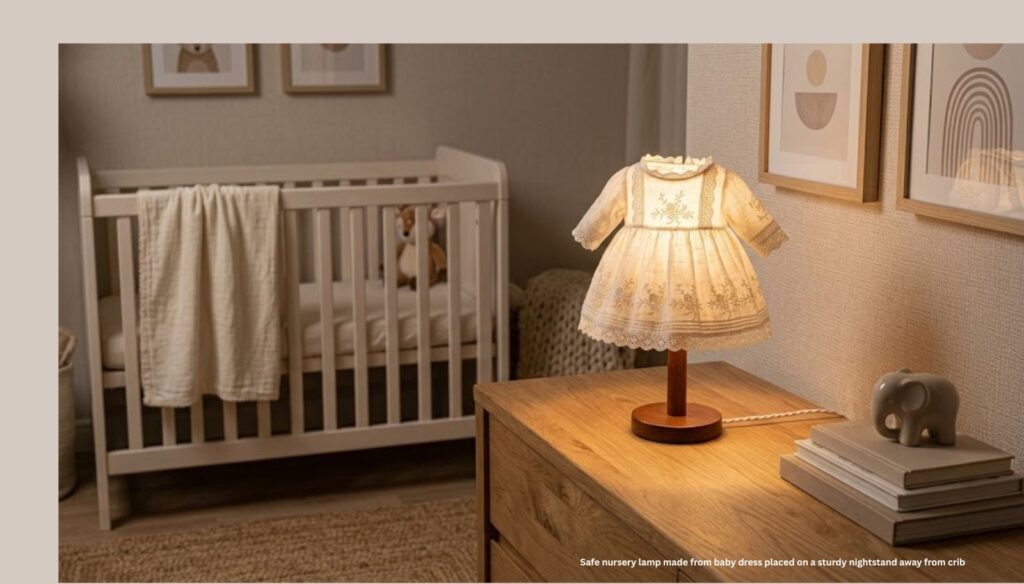
- Nursery Placement: Place the completed lamp on a sturdy nightstand or dresser at least 3 feet away from cribs, changing tables, and playpens. Ensure the power cord is tacked securely against the baseboards out of reach of pulling hands.
- Cleaning Routine: Never use wet sponges, liquid cleaners, or damp cloths to clean the shade. Clean surface dust once a week using a clean, soft makeup powder brush or a light blast from a canned air duster held 8 to 10 inches away.
- UV Protection: Natural cotton, silk, and heirloom lace degrade quickly under direct sunlight. Position the lamp away from unshaded windows to prevent fabric yellowing and fiber breakdown over time.
Frequently Asked Questions
Can I use a boy’s romper, suit vest, or button-down shirt instead?
Absolutely. Baby rompers, overalls, and tiny dress shirts look fantastic on Drum-shaped frames. You follow the exact same hidden basting process around the collar seam and armholes.
How do I remove the dress if I want to wear or sell it later?
Take a small pair of curved embroidery scissors and carefully snip the visible thread loops on the inside of the frame. Pull the loose thread strands out. The dress drops free immediately, completely undamaged and ready to be washed or worn.
Is it safe to leave this lampshade on all night as a nightlight?
Yes, provided you are using a quality 4.5W (or lower) LED bulb and have verified the 2.5-inch air gap between the bulb and fabric. Modern LEDs generate almost zero heat, making them completely safe for extended overnight use.