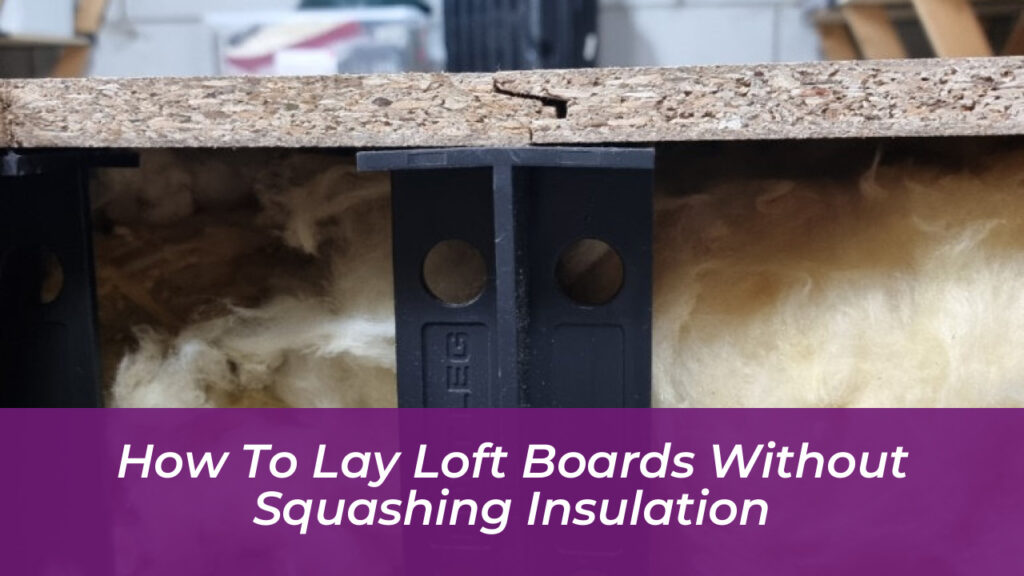
Transforming an empty roof space into practical storage is one of the most rewarding home improvement projects you can undertake. However, many homeowners rush into the project by screwing timber panels directly to the ceiling joists, making a critical mistake that quietly drives up energy bills. Modern building standards require substantial thermal depth-often 270mm or more of mineral wool or glass fibre-which far exceeds the height of standard ceiling joists. When boards are forced flat against this material, the trapped air pockets collapse, ruining thermal efficiency and increasing household heating costs.
Protecting your home’s thermal envelope while still gaining valuable storage requires a raised platform strategy. By elevating the flooring well above the quilt layer, you preserve the integrity of the material and create a sturdy platform for boxes and seasonal items.
Why Direct Boarding Ruins Thermal Efficiency
Insulation works on a simple principle: trapping millions of tiny pockets of stationary air within its fibrous matrix. These microscopic air spaces act as a thermal barrier, stopping heat from escaping through the roof.
When boards are screwed straight down onto the joists, the heavy weight compresses the loft insulation flat. A depth of 270mm crushed down to the height of a 100mm joist loses more than half of its thermal performance. Heat escapes rapidly into the cold roof space, forcing your heating system to work harder and leaving you with higher utility bills.
Beyond heat loss, squashing the material restricts natural air circulation around the joist structure, which can cause condensation to build up in the timber. Maintaining the full, fluffy depth of your quilt insulation is non-negotiable if you want an energy-efficient home that stays dry and structurally sound.
Essential Preparations Before You Start
Before buying timber or mounting hardware, assess the physical condition of your roof space. A successful installation relies on a few fundamental checks:
- Check Joist Strength: Standard ceiling joists are engineered to hold up the plasterboard ceiling below, not to act as a heavy-duty habitable floor. Most modern homes safely handle light domestic storage loads of up to 25kg per square metre, but older properties may require a professional structural assessment.
- Measure Insulation Depth: Confirm the exact thickness of your current material. If you have older, thin layers, it is often wise to top up the depth to current recommendations before installing any raised flooring framework.
- Locate Services: Identify the paths of electrical cables, water pipes, and junction boxes. Never squash wires or pipes beneath your boards, as this creates serious fire and safety hazards.
- Inspect for Damp: Look closely at the roof timbers and felt for signs of leaks, moisture, or mould. Resolving damp issues must always happen before laying down any new flooring.
Step-by-Step Guide to Laying Loft Boards Safely
Using a dedicated raised support system-such as specialized structural plastic legs or steel stilts-is the industry standard method for protecting your insulation.
1. Clear and Prepare the Workspace
Clear away dust, old debris, and any random clutter from the work area. If your insulation features a loose top-up layer, gently roll back those sections directly over the joists where you need to attach your support feet. This ensures a direct, solid mechanical fix into the timber structure rather than screwing blindly through soft material.
2. Install the Raised Support System
Position your support legs or stilts along the exposed joists at the manufacturer’s recommended intervals-typically spaced around 600mm apart, depending on the panel sizes you plan to use. Screw each support securely into the joist using heavy-duty 4.0mm x 30mm multi-purpose screws. Ensure every support stands completely vertical and level before moving forward.
3. Manage the Insulation Around Supports
Where the raised supports intersect with your quilt insulation, make a small, neat slit in the material. Gently tuck the fibres down and around the base of the support leg. This keeps the insulation continuous and snug against the support without leaving gaps where heat can escape.
4. Lay Tongue-and-Groove Loft Panels
Select 18mm or 22mm moisture-resistant tongue-and-groove chipboard or OSB loft panels. Start laying the boards near the loft hatch and work your way outward across the newly created raised framework. The interlocking tongue-and-groove edges distribute weight evenly across the entire platform and eliminate annoying creaks.
5. Secure the Boards Properly
Fix each panel firmly to the support legs using appropriate screws designed specifically for loft boarding. Drive one screw per support point per board to lock the platform tightly in place. Always leave a small 5mm expansion gap around the perimeter walls to accommodate natural timber movement caused by seasonal temperature changes.
Critical Mistakes to Avoid
Avoiding common pitfalls ensures your completed storage area remains safe, compliant, and durable for decades.
- Never Block Eaves Ventilation: Lofts require constant airflow to prevent condensation and rot. Never run your boards right up to the outside walls. Leave a clear 50mm ventilation gap at the eaves so air can circulate freely from soffit to soffit.
- Do Not Use Oversized Screws: Standard long wood screws can split your support legs or fail to seat properly. Stick strictly to the fastener dimensions recommended by your flooring system manufacturer.
- Avoid Trapping Electrical Cables: If cables run across the top of your joists, plan your layout carefully to route boards around them. Trapping wires underneath heavy panels can pinch the cables and cause dangerous electrical faults.
- Never Overload the Space: Remember that a raised storage floor is designed for suitcases, holiday decorations, and plastic storage boxes-not heavy furniture, dense libraries, or exercise equipment.
Finishing Touches for Your Loft Space
Once the primary flooring platform is secured, a few smart additions can make your loft much more functional. Install battery-powered or mains-linked LED lighting so you can navigate safely without dragging extension cords up the ladder. If your loft features recessed downlights, fit fire-retardant downlight covers (often called loft lids) before arranging your insulation around them. These covers prevent overheating hazards while maintaining an airtight seal that stops warm household air from leaking into the cold roof void.
By taking the time to install a raised support system rather than taking shortcuts, you successfully balance energy efficiency with practical storage. Your home stays warm, your insulation performs at its peak, and you gain a safe, reliable area to store your belongings.