
Staining pine can feel like a gamble where the house always wins. One minute you are admiring a pale, affordable tabletop, and the next, a swipe of stain turns it into a blotchy, uneven mess that looks like it survived a mudslide. Pine is undeniably budget-friendly and everywhere you look, but its unique biology makes it notoriously unpredictable. Soft earlywood drinks up pigment like a dry sponge, while dense latewood and stubborn knots push it away entirely. If you want to transform humble pine furniture into a showpiece that rivals expensive hardwoods, you need more than just hope and a can of cheap stain. You need the right products, a disciplined preparation routine, and an understanding of how softwoods behave.
Getting professional results on pine furniture requires cutting through the marketing hype and focusing on proven techniques. Whether you are building a rustic farmhouse dining table, upgrading a set of nightstands, or refinishing an old bookshelf, choosing the correct formula changes everything. Let us break down the top-performing wood stains for pine, examine the mechanics of wood preparation, and walk through the exact steps required to achieve a rich, consistent finish every time.
Why Pine Is So Unforgiving to Stain
Before diving into specific product recommendations, understanding the enemy is essential. Pine is a softwood with stark variations in density across its growth rings. When you apply a traditional penetrating liquid stain directly to bare pine, the porous earlywood areas absorb vast amounts of pigment instantly. Meanwhile, the harder summer growth rings and knots resist penetration.
This stark contrast creates blotching-random dark patches and light streaks that obscure the natural grain. Pine also contains natural resins, especially around knots, which can completely block stains or create unsightly halos. Without proper intervention, even an experienced woodworker can end up with an amateur-looking finish. Mastering pine is not about finding a magic stain that fixes everything on its own; it is about controlling absorption before the pigment ever touches the wood fibers.
Top Wood Stains for Pine Furniture
After testing numerous formulations on real pine boards, certain products consistently outperform the competition. Depending on whether you prefer deep rich browns, modern weathered grays, or foolproof application methods, one of these options will fit your next project.
1. Varathane Gel Stain (Best for Beginners & Consistency)
If you want to eliminate the fear of blotching entirely, gel stain is your best friend. Unlike traditional liquid stains that sink deep into the grain, gel stain features a thick, pudding-like consistency that sits primarily on top of the wood. This controlled application allows you to wipe on rich, uniform color without the wood sucking up pigment unevenly. It is exceptionally forgiving on softwoods and requires far less surface prep perfection.
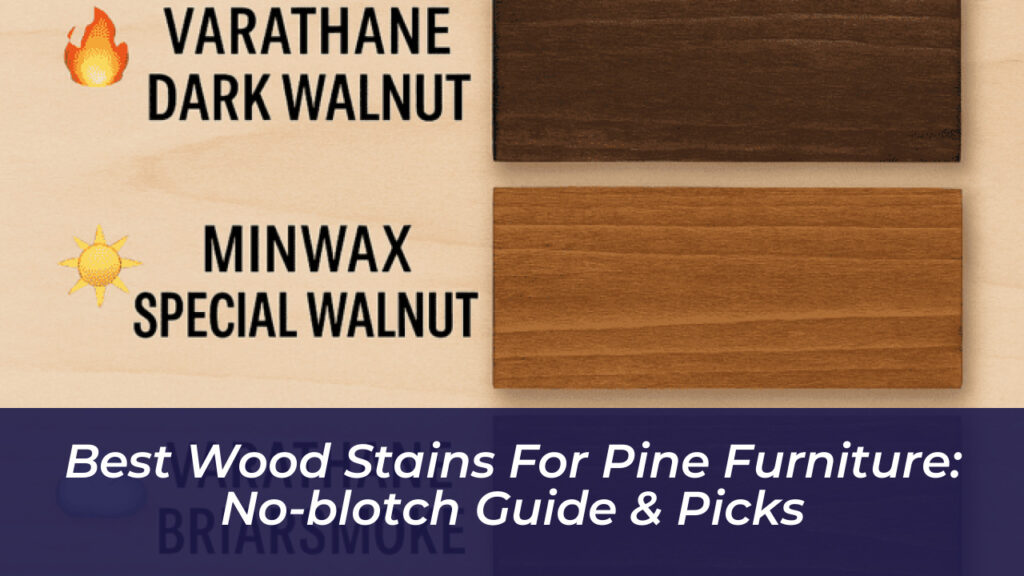
2. Varathane Dark Walnut (Best for Rich, Deep Tones)
For those aiming for a high-end, classic aesthetic, Varathane Dark Walnut delivers incredible depth. It glides on smoothly and provides a warm, sophisticated brown tone that instantly elevates cheap pine lumber to look like expensive walnut or mahogany. While using a pre-stain conditioner is still recommended, this particular formula handles pine remarkably well, drying evenly when applied with a clean lint-free cloth.
3. Minwax Special Walnut (Best Balanced Classic Look)
Minwax Special Walnut is the gold standard for anyone chasing that quintessential mid-tone wood aesthetic. It leans neither too dark nor too light, striking a perfect balance of warmth and neutrality. It makes pine look like authentic reclaimed timber found in a cozy mountain cabin. It wipes away cleanly and responds predictably to multiple thin layers if you want to dial in a deeper shade gradually.
4. Varathane Weathered Oak (Best for Modern Farmhouse Styles)
If bright orange undertones or heavy golden hues are not your style, this soft, sun-faded gray stain is a revelation. Weathered Oak imparts a subtle, cool neutral tone that highlights the natural grain pattern without overwhelming the room. It works exceptionally well on pine accent shelves, coffee tables, and floating mantels where a lighter, contemporary finish is desired.
Essential Tools for Staining Pine
Achieving a professional finish requires more than just good stain. Having the right supporting gear in your workshop prevents rookie mistakes and ensures a clean application.
- Minwax Pre-Stain Wood Conditioner: The ultimate secret weapon against blotchiness. It primes the porous fibers so they absorb pigment evenly.
- 180-Grit Sandpaper: The sweet spot for pine. It leaves the surface smooth without polishing it so fine that the wood refuses to absorb stain.
- Lint-Free Rags: Essential for wiping away excess stain without leaving behind fuzzy clothing threads embedded in your finish.
- Nitrile Gloves: Protects your hands from stubborn oil-based pigments that linger under fingernails for days.
- Natural Bristle or Foam Brushes: Inexpensive and disposable, perfect for working stain into tight corners and panel bevels.
Step-by-Step Guide to Staining Pine Without Blotches
Skipping steps when working with pine is a guaranteed recipe for disappointment. Follow this rigorous step-by-step process to ensure your furniture looks expertly crafted.
Step 1: Sanding the Wood Smoothly
Pine is a soft wood, meaning stray scratches and aggressive sanding marks get severely magnified once stain is applied. Start your sanding process with 120-grit sandpaper to remove mill marks or minor blemishes, then finish up with 180-grit. Never exceed 220-grit on pine; sanding past this threshold closes the wood pores too tightly, preventing any stain from penetrating properly. Always vacuum and wipe away all residual sawdust with a tack cloth before moving forward.
Step 2: Applying Pre-Stain Wood Conditioner
Do not skip this step. Paint or wipe a generous coat of pre-stain conditioner across your bare pine furniture using a clean cloth or brush. Allow the conditioner to penetrate the wood for 5 to 15 minutes, then firmly wipe away any excess liquid that has not soaked in. This product temporarily seals the hyper-porous earlywood fibers, ensuring that your actual stain applies evenly across every board.
Step 3: Testing on a Scrap Piece
Never apply a new stain directly to your completed furniture piece without testing first. Take a scrap piece of pine from the exact same board bundle, sand it identically, apply conditioner, and test your stain. This gives you a true preview of the drying time, wiping duration, and final color tone.
Step 4: Applying the Stain and Managing Wipe Times
Stir your stain thoroughly-never shake it, as shaking introduces air bubbles that ruin your application. Apply the stain generously in the direction of the wood grain using a brush or cloth. Let it sit for roughly 2 to 5 minutes depending on how deep you want the color. Take a clean, lint-free rag and vigorously wipe away all excess surface stain. Leaving excess stain on pine creates sticky, uneven patches that never cure correctly.
Step 5: Sealing with a Protective Topcoat
Stain provides color, but it offers zero physical protection. Once your stain has cured completely-typically 24 to 48 hours for oil-based formulas-you must lock it down with a clear protective finish. For indoor pine furniture, water-based polycrylic dries crystal clear and prevents yellowing over time. For high-traffic tabletops or pieces requiring maximum durability, traditional oil-based polyurethane offers superior scratch and moisture resistance. Apply two to three thin coats, lightly sanding with fine 320-grit paper between coats for a glass-smooth touch.
Common Mistakes to Avoid When Working with Pine
Even seasoned DIYers occasionally run into trouble if they rush their workflow. Keep these pitfalls in mind:
- Skipping the Conditioner: Expecting uniform color without conditioner on raw pine is like walking through a rainstorm without an umbrella and expecting to stay dry.
- Leaving Too Much Stain on the Surface: Staining wood is not like painting walls. Pigment must penetrate the pores; excess sitting on top ruins the finish.
- Using Old or Separated Stain: Stains expire or separate over time. If the pigments have clumped heavily at the bottom of the can and refuse to blend, discard it.
- Ignoring Wood Movement: Pine expands and contracts with seasonal humidity shifts. Always account for wood movement in your joinery to prevent cracked finishes down the road.
Frequently Asked Questions
Should I always use a wood conditioner on pine?
Yes. Unless you are using a thick gel stain or specifically aiming for a heavily distressed, rustic finish with high contrast, a pre-stain conditioner is vital for achieving an even, professional look.
What sandpaper grit is best for pine before staining?
180-grit is the optimal sweet spot. It provides a silky-smooth surface texture while keeping the wood grain sufficiently open to accept pigment.
Can pine be made to look like walnut or oak?
While pine will never completely replicate the distinct pore structure of hardwoods like red oak or walnut, using a quality pre-stain conditioner combined with a rich walnut-toned gel or oil stain allows pine to mimic the dark, elegant color profile of expensive hardwoods quite convincingly.
How long should I wait before applying polyurethane over stain?
Always check the manufacturer instructions on your specific stain can. Water-based stains can often be topcoated within a few hours, but oil-based stains typically require a minimum of 24 to 48 hours to fully off-gas and dry before sealing.
Final Thoughts
Pine’s reputation for being difficult to finish is entirely undeserved; it simply demands respect for its unique properties. By trading guesswork for a disciplined system-thorough sanding, diligent pre-conditioning, testing your swatches, and wiping away excess pigment-you can turn inexpensive softwood boards into stunning, heirloom-quality furniture. Take your time with the prep work, choose a reliable stain formula, and your pine projects will reward you with gorgeous, professional results.



